
How to Build an AR-15 Lower Receiver [Ultimate Visual Guide]
Don't want to mess up? Learn how to build an AR-15 lower receiver with 80+ pictures, tricks I learned the hard way, and recommendations of the best parts.

PPT Founder. NRA Pistol Instructor. USPSA/3-Gun/NRL22 Competitor. 250+ articles
We review products independently. When you buy through links on our site, we may earn a commission to help support our testing. Learn more.
There's nothing like assembling your own AR-15 lower receiver for personal satisfaction and customization.
I'll guide you through everything with minimal tools and tons of tips I've learned the hard way!
So get ready for A LOT of pictures that will make building your lower a breeze. Plus a bonus of the upgrades I immediately did to my lower to make it perfect for 3-Gun competitions.
But first...a disclaimer that this is for educational use only. If you don't have the right tools or experience, please have this done by a professional or buy a completed rifle (Best AR-15 Buyer's Guide).
Table of Contents
Trending: Best AR-15s & CCW Guns Under $400
Parts and Tools
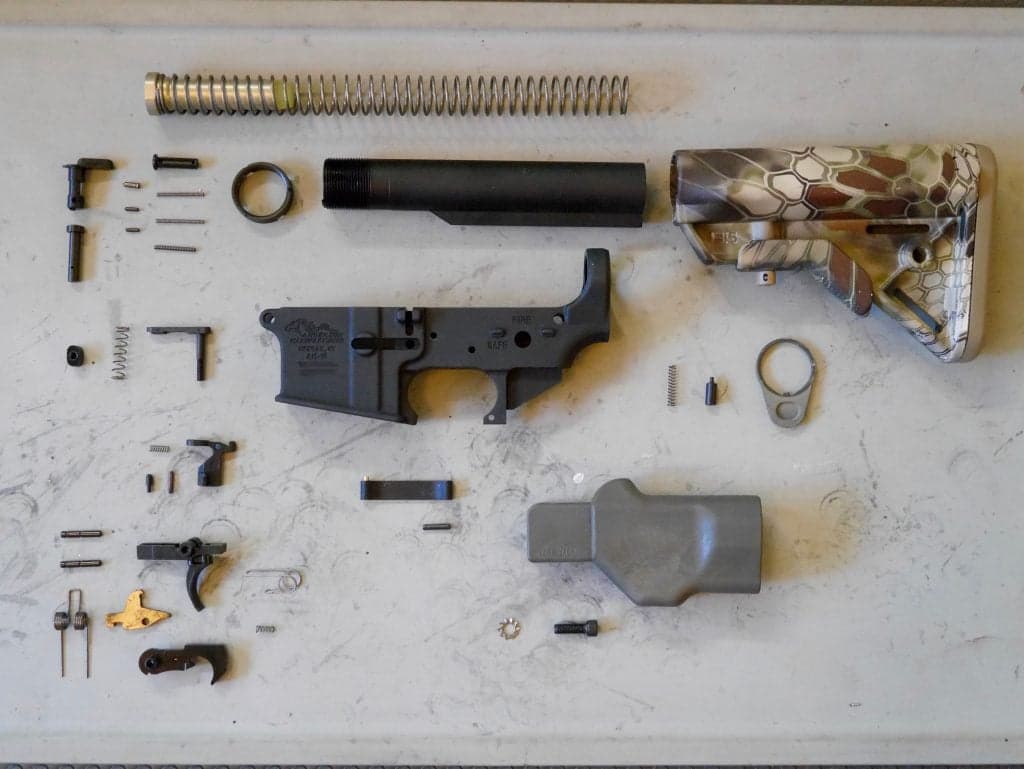
Parts
I went with a California featureless build so there's the funky looking grip. But otherwise, everything is pretty standard.
I haven't found much difference between lower parts kits and buffer tube assembly's as long as there are decent reviews and not a no-name company:
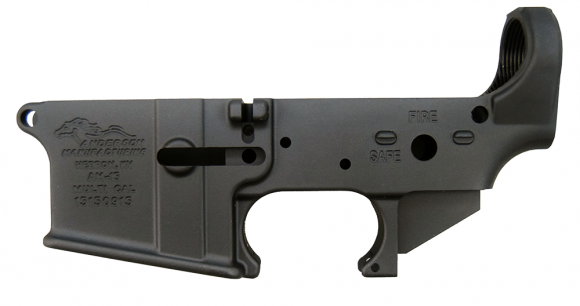
- Anderson stripped lower receiver: Also check to see what your local gun shop has to avoid shipping and extra fees.
- Anderson lower parts kit ($75)
- Mil-Spec Buffer Tube Assembly ($60)
- Bravo B5 Stock ($60)
Tools
- Punch Set ($15): I prefer brass so you don't mar up your lower receiver and it's good for lots of other gun stuff too
- Long Arm Hex Key Set ($12): You'll be using hex keys or Allen wrenches in a lot of installations. Go with the long arm versions for extra reach.
- Hammer ($10): I like the rubber/plastic ends instead of standard steel since there are very few times when you actually need that much force...also if you use it directly on gun parts, you will not mar the finish
- C-Clamp ($10): Not super necessary but useful to install the trigger guard, 4-inch should be good
- AR-15 Combo Tool ($20): Good for installation of the castle nut, but more useful for upper receiver builds
- Utility Knife ($7): Needed for the pivot pin installation
Alright, let's get onto the actual build!
Magazine Catch Assembly

You can start your AR-15 lower receiver build many different ways but I like knocking out some of the easier ones first for quick wins.
Find these three parts along with your lower receiver. The magazine spring is the largest width spring in your kit.

Place the magazine release spring into the hole shown above.

Place the magazine release button on top of it with the serrated side up.

Press in the magazine release button and flip the receiver over to start threading in the magazine catch.
It might be a little tricky the first time you do it since you have to maintain decent pressure on the button to make it flush against the receiver while matching up the threads. Righty-tighty!
Make sure the catch doesn't scrape against the raised portions of the receiver.

Once you have it threaded slightly you can release the pressure and rest your fingers for a little.
Then get ready to do it again!
Press down the magazine release even further into the receiver past the flush line and tighten the magazine catch a couple more times.

Check once in a while.
Here you can see that there's a gap between the mag catch and the receiver when you're pressing the mag release button flush.
You'll need to tighten more or else the mag catch could fail to go back into the receiver during a reload.

This is a good distance where the magazine catch will not leave the receiver unless somehow you manage to really smash in the magazine release button.
You can test with some of your mags to make sure it catches and releases.
Congrats! You've installed the first section of your AR-15 lower receiver.
Trigger Guard Assembly
Some lowers have this part as part of the stripped lower...but most likely you'll have to do it yourself.

Find the trigger guard and the longer roll pin.

Depress the pin of the trigger guard which will be closer to the magazine well.
Don't worry, the two sides are differently sized so you can't mess it up. Then just slip it in.

Sometimes I find that the other side has a hard time dropping in so I lightly press down or even use the plastic hammer (lightly) if it's slightly more stuck.

Make sure everything is lined up for the roll pin.

You can either start it with the hammer, with a punch, or just with your fingers. I like using the hammer to get started then using the C-Clamp below.
It's much easier than trying to hold down the receiver while hammering.
Note: If you decide to go with just hammering...make sure you are supporting the dog ears or else they can pop off pretty easily even on a good quality lower.

I did end up marring my finish a little so I would heavily suggest using some plastic. (I've heard a little piece of milk carton plastic between both sides of the clamp will do wonders.)

On my installed trigger guard, you can see a little damage to the finish. But I know I'll be dealing a whole lot more damage to the receiver at the range and during competitions.
Bolt Catch Assembly

Find these parts!
The bolt catch spring is even throughout while the other remaining smaller spring is fat on one end for the disconnector.

Place the spring on the plunger and drop it into the hole above the magazine latch.

Orient the bolt catch like above and drop it down.

You will need to depress the bolt catch for everything to line up. I like using a hammer and punch to get it started.

Apparently, there's a special tool to clamp the roll pin but I decided to make my own.
However, it wasn't protective enough so I would suggest wrapping your pliers with tape first then some cloth. Or you can just continue using the punch all the way through.

The finished bolt catch with just a little bit of marring.
That wasn't so bad, right? The trigger coming up is a little tricky but don't worry, I got you!
Trigger Assembly

Pick out these parts from what's left.

Attach the springs according to what you see above.

Place the fat side down into the trigger so that the spring stays put.

Place the disconnector onto the spring.

Press down on the disconnector to see the trigger hole. You'll be placing this assembly into the receiver and then putting a pin through it.

Place the assembly so that the trigger goes through the oval bottom of the receiver.

Match up everything so that you can see the clear hole for the pin.

I sometimes find the trigger pin has some trouble once it's almost through. So, I resort to using a brass punch after matching it up.

Here you see the fully installed first trigger pin.
Double-check the placement of the hammer and spring. Make sure the springs lay on top of the first trigger pin.
They'll be decent pressure to align the second trigger pin hole.

Once you get the trigger pin halfway through, I like cocking the hammer down so that it eases the pressure a little bit.
It turned out extra stiff so I used the brass punch.

Here's the installed trigger assembly.

Resist the urge to dry fire!
Doing this will release the hammer which has nothing to hit except the lower receiver. And enough of that will start to damage it.
I hold the hammer down with my other hand so that it slowly releases instead of slamming into the receiver wall.
And there you have it...the trigger assembly!
Safety, Takedown Pin, Grip, & Receiver Extension
Still with me? We're in the home stretch now.

These should be the remaining parts in your kit. Note the different sizes of springs relative to each other. The two skinnier longer ones are identical for the takedown and pivot pins.

Let's start with the grip.
The top one is a normal pistol grip while the bottom is the CA legal Hammerhead grip.
Both have holes for a screw and washer. You might just need a longer hex key for the pistol grip to reach all the way in.

But first, let's cock the hammer back so it opens up the safety selector hole.

Insert the safety selector.

Set the position to "Fire."

Find the safety detent (pointed side into the receiver) and put it in the hole on the opposite side of the safety indicator.

A much better view of the silver safety detent installed.

Find the safety detent spring. It's the thinner one that is slightly shorter than the other identical thin springs.

Insert it into the hole at the top of whatever grip you're going to use.

Sometimes the grip doesn't fit on easily (nor do you want it to be loose). I find that using a big flathead makes it easier to slide onto the lower receiver.

Match up the spring with the safety selector hole and double-check that the safety selector is still in the "Fire" position on the opposite side.

Screw in the grip with the enclosed hex nut and washer.

Look for the shorter pin (rear takedown pin) which will have an identical spring and detent to the longer pin (pivot pin).

Install the rear takedown pin from the left to right (shown fuzzily, sorry!) and also place the detent in the back of the receiver.
It helps to orient the takedown pin so its "channel" will accept the detent.

Insert the detent spring.

Now find the buffer retainer and spring (thickest one left) and place them in the hole above.

Also, take a look at your end place where one side has protrusions that will fit nicely with the back of the receiver.

But first, screw on the castle nut in the position above. With the bigger square cuts toward the back of the lower receiver.

Then put on the end plate in the correct orientation. I've definitely done this in the wrong order, so please learn from my fails!

Start screwing in the buffer tube. The end plate will move with each turn and start messing with the spring.
Try your best to not let it come out.

When you're almost done screwing in the buffer tube, take a break to look at the other side.

You want to stop right before the buffer tube reaches the buffer retainer.

Perfect fit with just a little bit more of a turn.

Now you need to match up the end plate with the receiver and also make sure that when the plate is tightened that it will hold the spring.

Start screwing in the castle nut with your hands first.

If you have an AR-15 armorer's tool, it will have a section to tighten the square cuts. I'd heavily recommend that since it's only a few bucks.
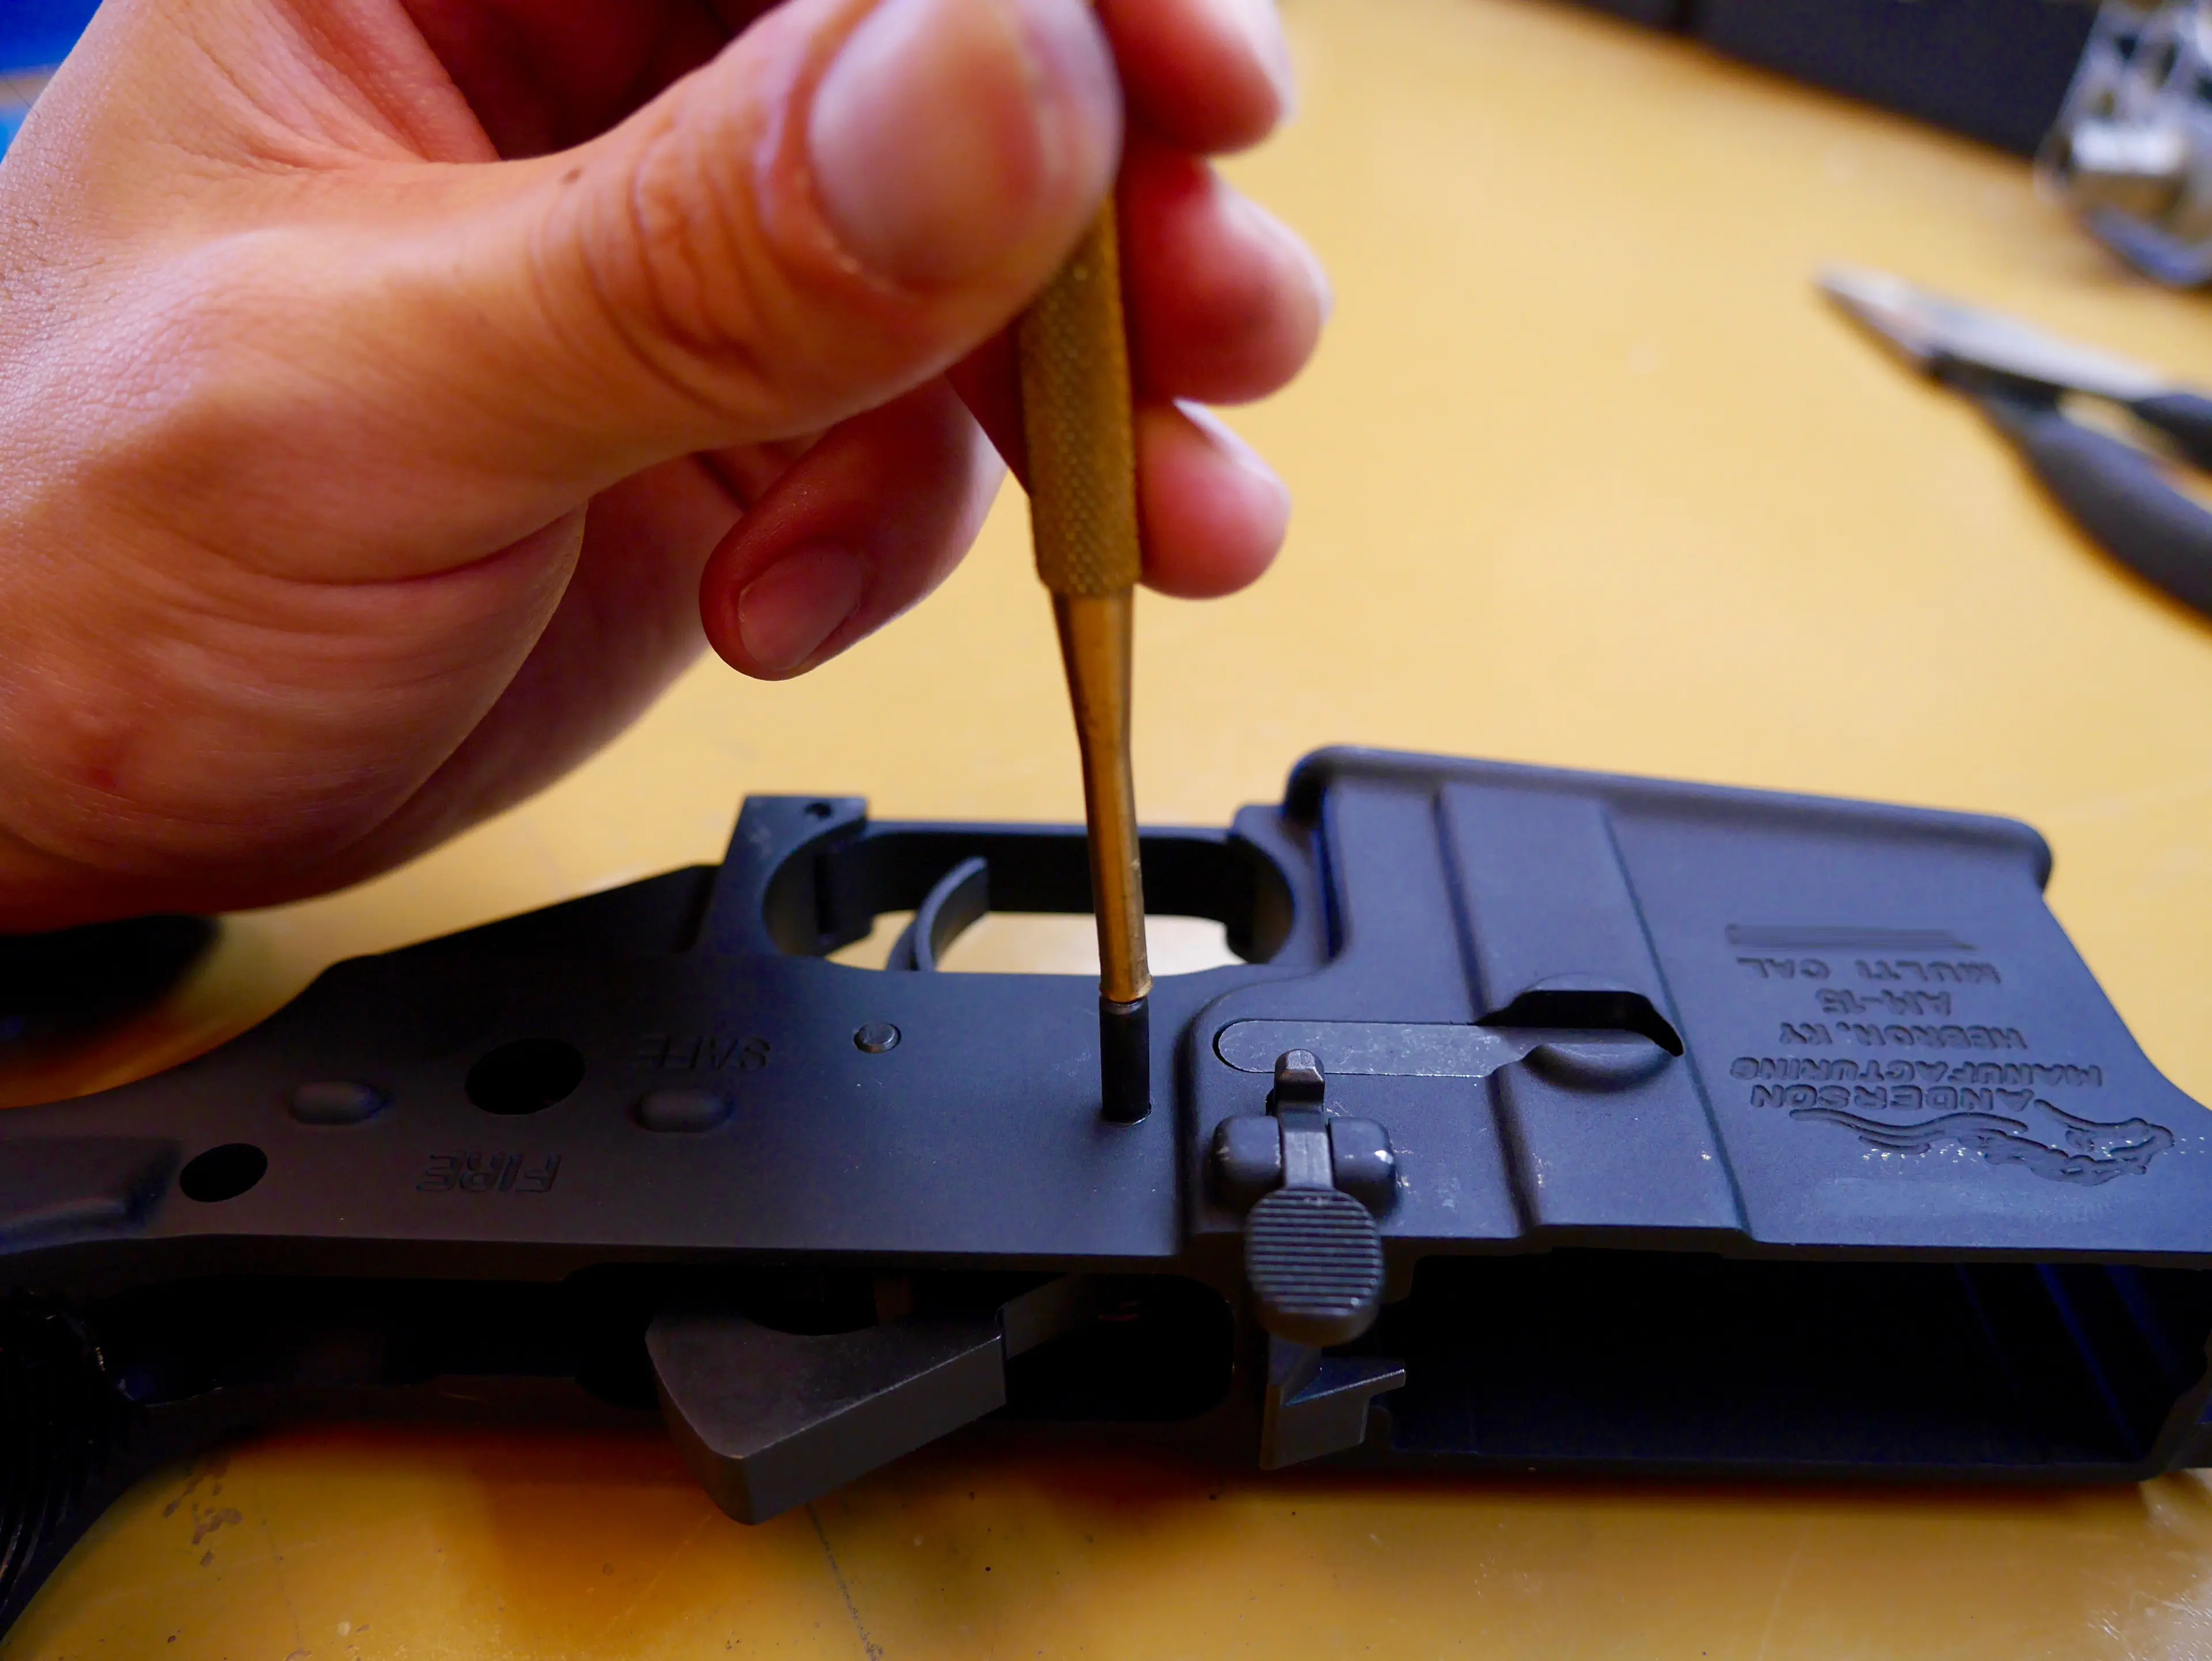
But otherwise, you can also just lightly punch it tight.

You can also "stake" your castle nut where you use a center punch to smash in the end plate into the smaller cuts of the castle nut.
I would recommend testing out your lower a lot beforehand since it's annoying to undo but really keeps it together. Also, make sure your end plate allows staking.

Now find the last pin, screw, and detent that will be for the front pivot pin.

Place the detent spring in first.

Followed by the detent.

Time to whip out the pliers and utility knife to hold the pin down flush against the receiver since you'll be sliding the pivot pin over.
I'd recommend doing this in a sideways cardboard box or something above you to catch the potential flying detent and spring if you mess up. Also, you might want some eye protection.

Insert the front pivot pin over the knife blade with the channel facing where the detent will spring out. This will install the pivot pin.

Ta-dah!

Now find your stock and buffer and buffer spring. Yes, it's super ugly but I got it since it was the cheapest "color."

Insert the buffer spring in.

The buffer end will orient like the above.

Slide on the stock until it doesn't move easily.

Pull the adjustment tab out and continue moving the stock inwards. You can now use the adjustment tab to select your preferred distance.
And YOU'RE DONE!
Unless you're in CA and want to pin your stock, then check out my How to Pin a Collapsible Stock Guide.
But if you're like me...you want to make your AR-15 lower receiver the best it can be. Here are the upgrades I added immediately.

AR-15 Lower Receiver Upgrades

JP Silent Captured Spring
The JP Silent Captured Spring is one of the best upgrades to make your AR-15 feel like a pellet gun! It takes away the *sproing* of the traditional buffer tube and drastically reduces recoil.
If you're going with a lighter BCG, I'd recommend getting it with the additional springs so you can truly tune your gun. Otherwise, the stock spring works great.
Check out how to Install & Tune the JP Silent Captured Spring in our article.

Ambidextrous Safety
An Ambidextrous Safety is useful especially when you're running a CA featureless rifle, but if you're a lefty it's critical.
For tips, see How to Install Your Ambi Safety.

Magpul BAD Lever
The Magpul BAD Lever is on every single one of my lower receivers. It makes manipulating the bolt super easy from your right hand.
Install it in less than 5 minutes.

Hiperfire Trigger
Swapping out the trigger is probably the best upgrade you can do to your AR-15.

The Hiperfire Trigger is a new single-stage trigger that has no perceptible creep, little reset, adjustable weights (I run mine at the lightest 2.5-pounds), and actually increases the hammer strike power.

One of the weaknesses of other triggers is that while you can get light pulls, those sometimes can lead to light primer strikes too.
See my in-depth review. The installation was also much easier than I expected given the number of parts.

Conclusion
I know it seems intimidating but building your own AR-15 lower receiver doesn't have to be scary. With this guide and the right tools, you'll be ready to rock your AR-15.
If you need more help in building your lower or your full AR-15 for that matter, check out Brownells' series How to Build an AR-15 Tutorial.
How did your first AR-15 lower build go? Let us know in the comments below. And pair this guide with our How to Build an AR-15 Upper Receiver and also check out the Definitive AR-15 Resource for even more upgrades, optics, etc.