
How to Clean & Lubricate Your Glock The Right Way: Step-By-Step Guide

Learn how to clean & lube your Glock safely, according to the manual. Complete with video, tons of pics, and recommended tools/cleaners.
We review products independently. When you buy through links on our site, we may earn a commission to help support our testing. Learn more.
Got a Glock? Congrats! They’re fantastic pistols.
Despite what you may have heard, you will have to give that pistol some TLC on a regular basis if you want it to live up to its potential.

Let me show you how to clean and lubricate your Glock the right way – and that’s according to Glock, not internet lore. I’ll also throw in some helpful tips and products that can make the job easier and more effective.
Let’s get that Glock sparkling clean!
Table of Contents
Trending: Best AR-15s & CCW Guns Under $400
What You Need Before You Start
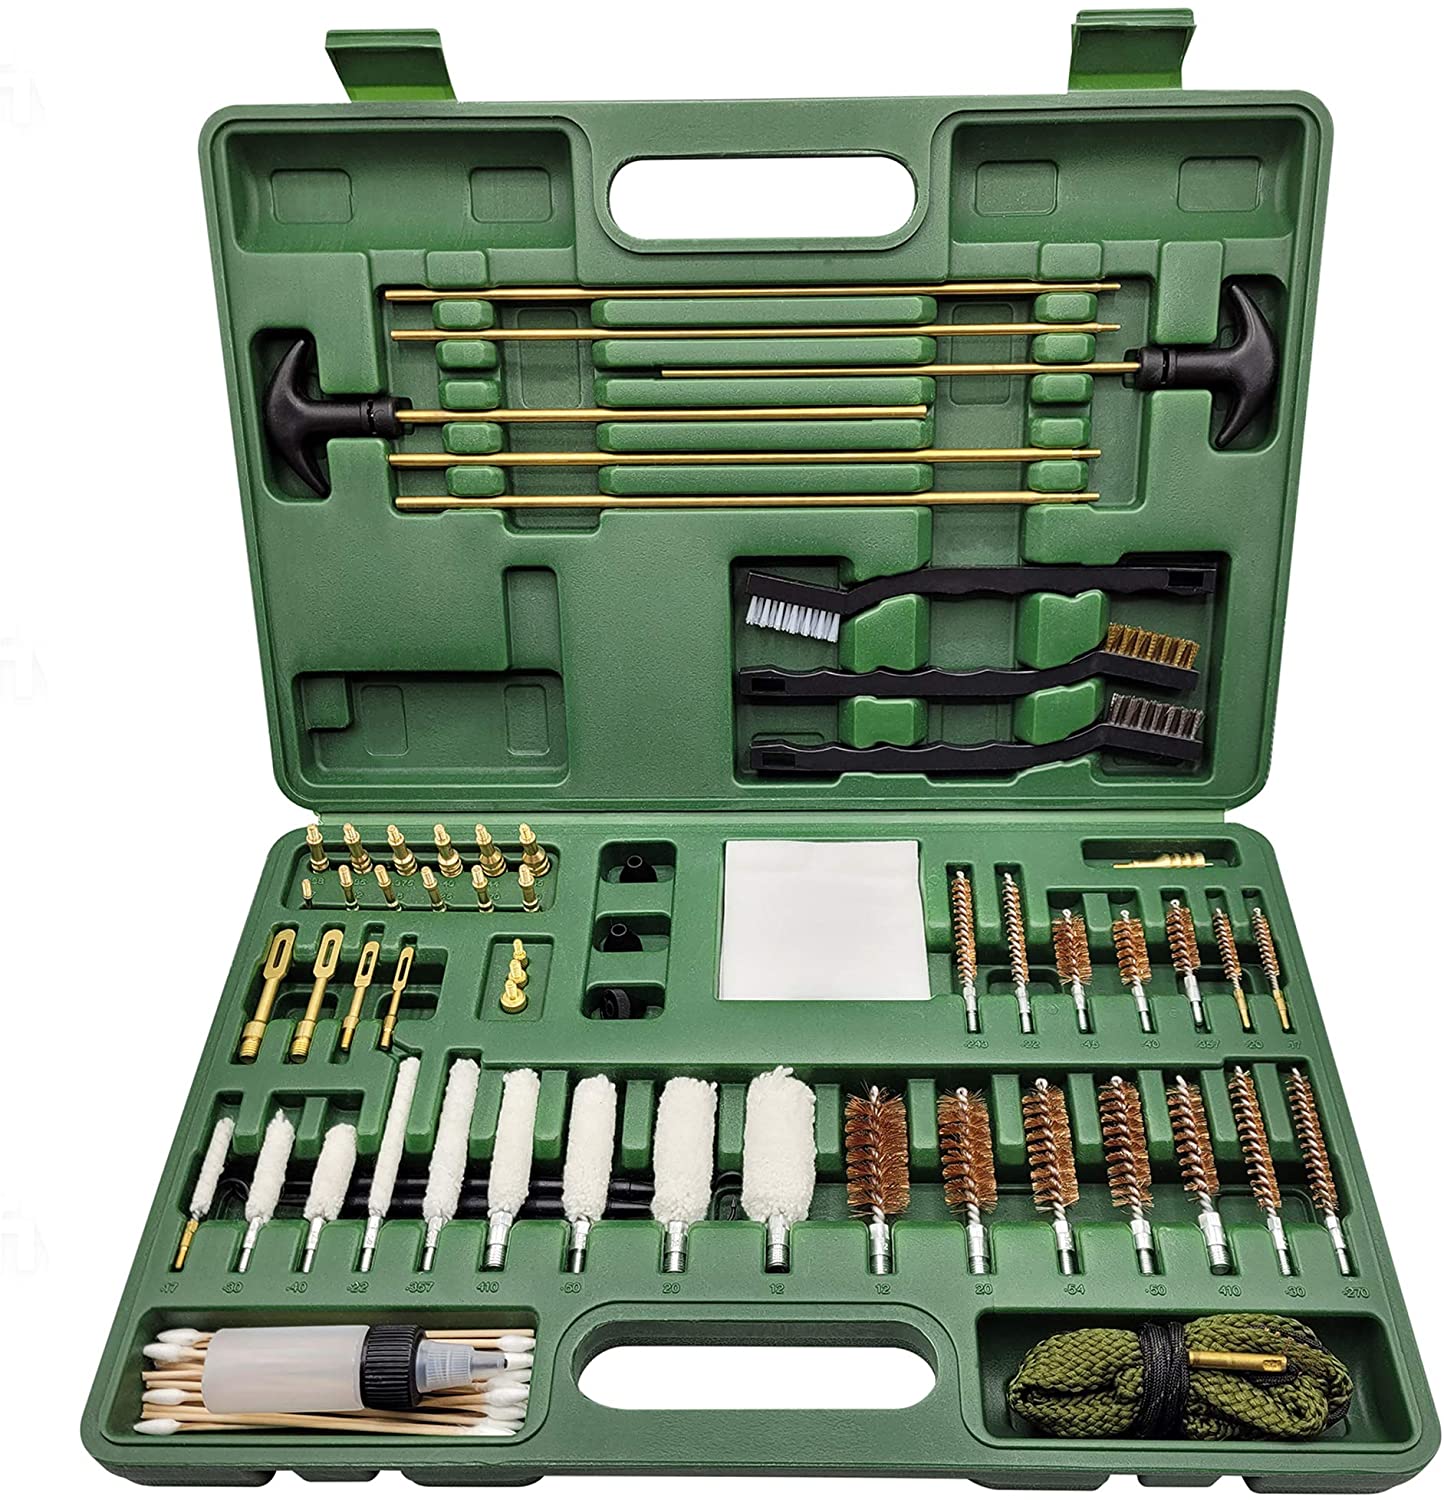
Must-Have Tools
- Glock pistol
- Cleaning rod
- Bore brush
- Patches
- Bore cleaner
- Gun oil
Nice-to-Have Tools
- Upgraded cleaning kit
- Nitrile gloves
- Microfiber cloths
- Bright lighting
- Optic cover or masking tape
How to Clean & Lubricate Your Glock
Let's take it nice and easy, one step at a time.
Step 1: Clear Your Pistol and Make it Safe
Before you do anything else, make sure your pistol is empty and safe to disassemble while following the four firearm safety rules.

Press the magazine release to drop the magazine. Set it aside and make sure your workspace is free of live ammunition.
Lock the slide to the rear so you can visually and physically check for ammunition in the pistol itself. I make a habit of checking the magazine well, chamber, and breech face of any firearm I’m about to handle.

Once you’re satisfied, return the slide to the forward position.
Step 2: Disassembly or Field Strip
With your pistol cleared and pointed in a safe direction, pull the trigger. You’ll hear a click and see the trigger stay to the rear.

With one hand, grab the rear of the slide with your thumb under the beaver tail. Pull it slightly to the rear and use your other hand to pull the tabs above the trigger guard on each side of the frame.
Move the slide forward until it’s free, and set the frame aside for now.

With the slide upside down, compress the recoil spring and lift it out of the slide. It’s under about 17 or 18 pounds of tension, so don’t let it get away from you.
After removing the recoil spring, gently separate the barrel from the slide.

That’s it – your Glock is now disassembled and ready to clean.
See the whole process in action!
Step 3: Clean Your Glock
Whether you just took your Glock out of the box for the first time or came home from a grueling training session, it’s time to get that thing clean.
How to Clean Your Glock’s Barrel and Recoil Spring Assembly
Apply a coat of bore cleaner by running a damp patch down the bore with a cleaning rod. Check the bottle for instructions on how long to let it soak.

After it’s had enough time to work its magic, scrub the bore from the chamber end with a bore brush and cleaning rod to break free all the buildup that’s accumulated there.
Glock ships pistols with a nylon brush. I prefer to use a brass brush that can scrape away contaminants more efficiently without harming the bore itself. If you use a metal brush, make sure the cleaning rod can spin independently of the handle. This allows it to follow the rotation of the barrel’s rifling.

Wipe away the residue with patches and bore cleaner until they come out clean. Follow up with clean, dry patches to remove any remaining bore cleaner.
For long-term storage, lightly dampen one final patch with gun oil and run it through the barrel once to apply a thin, protective coat. If you do this, wipe the bore dry with a clean patch before the next time you fire it.
Wipe the barrel’s exterior surfaces clean, using a nylon brush and your preferred cleaning solution if necessary. Remove excess residue.

The recoil spring typically just needs a wipe-down with a clean cloth. If there’s excessive grime, use a nylon brush to remove it.
How to Clean Your Glock’s Slide
Apply some lubricant to a nylon cleaning brush – either the one from Glock or an all-purpose brush from your own cleaning kit – and give the underside of your slide a good scrubbing. Focus on the rail cuts, breech face, and extractor claw.

When you’re done, wipe the entire slide down with dry patches or a clean cloth. I prefer a microfiber cloth, which works faster than patches and doesn’t shed fibers like normal fabric or a paper towel. You’re done when they come up clean and dry. Depending on how dirty your pistol is, you might need to give it several scrub/dry cycles.
If your Glock is new, you might see some copper-colored deposits on wear surfaces. That’s not rust, it’s a special lubricant applied at the factory – so leave it alone.
If you have an optic that came with a silicone cover, use that to keep oil and debris off the window and emitter. Masking tape works, too.
How to Clean Your Glock’s Frame
Most of your Glock’s frame assembly is polymer, which is basically maintenance-free. Focus most of your attention on the internal metal components.

Wipe the frame rails clean, and iInspect visible trigger components for contaminants, signs of wear, or damage.
How to Clean Your Glock’s Magazines
You thought we’d forget, didn’t you? Let’s give those magazines some attention.

With an empty magazine, depress the small button on the basepad with a punch and slide it off the magazine. There may be a pair of tabs on the side of the magazine that you’ll need to squeeze to get enough clearance.
The spring inside is going to try to escape, to do this slowly and carefully.
Separate the basepad, magazine, spring, and plastic follower. Wipe them down and, if necessary, scrub them with a nylon brush and some cleaning solution or lubricant.
Return the follower to the small end of the spring, insert it into the bottom of the magazine, and reinstall the basepad. This goes for factory magazines and aftermarket ones, as well.
Magazines don’t need to be cleaned as often as your Glock, but it’s a good idea to get in there and remove carbon, dirt, and lint every so often. They’ll run more reliably and last longer if you do.
Step 4: Lubricate Your Glock
Once your Glock is free of all contaminants, grime, and dirty oil, it’s time to apply fresh lubricant. Don’t go crazy now, it just takes a drop in a few key places.

Glock recommends applying a thin coat of oil on the entire barrel. Pay special attention to where the barrel contacts the trigger bar and recoil spring.
Apply one drop of oil where the trigger bar touches the connector.

Apply oil along the full length of each slide rail cut. You can also accomplish this by putting a drop of oil on the slide rails. Racking the slide a few times once the pistol is assembled will spread it evenly.

Glock recommends applying a coat of oil to all exterior surfaces of the slide. This is one step I’ll add a personal caveat to. Glock’s modern slide finishes are very durable, and covering the whole thing in oil makes more of a mess than I care to deal with. Use your own judgement for this one.
Step 5: Reassembly
When you’re ready to put your Glock back together, start by inserting the barrel back into the slide and making sure it’s properly oriented.

Reinstall the recoil spring by compressing it with your fingers, inserting the front into the slide, and securing the rear into the notch in the bottom of the barrel.
Install the slide onto the frame by sliding it rearward onto the slide rails. Move it all the way to the rear, then allow it to return under control to the forward position. The trigger will reset and the frame lock tabs will click into place.
This is a great time to wipe down your red dot's window with a clean, dry lens cloth and scrub carbon off the lens of your pistol light (a pencil eraser works well).
Step 6: Function Check
Before you put your Glock away, you need to make sure everything works as it should. A function check will verify that it’s ready to rock.
Trigger Safety Test
With a safe and cleared pistol, try to depress the trigger without touching the trigger safety. It should stop short of engaging the striker. This proves that the safety mechanism in functional.

Trigger Function and Reset Test
Place your finger over the trigger safety and pull it as you normally would. You should hear the click of the striker snapping forward on an empty chamber. This proves that the pistol will fire.
Manually rack the slide. The trigger should visibly and audibly reset to the forward, ready position. This proves that the pistol will cycle properly in between shots.
Slide Lock Test
Insert an empty magazine and pull the slide to the rear. The slide should lock to the rear. This proves that the pistol will lock open on an empty magazine after you fire the last round.

With those tests completed, you can put your Glock away with full confidence that you reassembled it correctly and everything is working the way it did when it first left the factory.
Common Mistakes to Avoid

- Safety Violations: It should go without saying that you need to clear your pistol before you clean it, but we still hear about people hurting or even killing themselves or others during routine firearm maintenance. You can’t be too careful with this step.
- Not Cleaning Often Enough: Glocks are famously reliable, but that doesn’t mean you should abuse them. Glock recommends a thorough cleaning when you first buy your pistol, after every training session, as required, and once a year.
- Skipping Maintenance Items: There’s nothing wrong with checking this article every time you clean and lubricate your Glock. Sometimes people go by memory and miss the same step every time, leading to a failure point. Follow the manufacturer’s instructions every time to make sure you don’t skip anything.
- Not Using Enough Oil: Gun oil is cheap insurance, so don’t be stingy with it. If you live in a humid or corrosive environment (think salty coastal air), you might need to use slightly more oil to protect your pistol from the elements.
- Using Too Much Oil: More isn’t always better, so don’t go overboard with your gun oil, either. If you live in a particularly arid climate, excess oil can end up collecting dust and grit – exactly the opposite of lubricant – causing malfunctions and accelerated wear.
- Leaving Bore Cleaner in the Barrel: Bore cleaner is great at removing carbon buildup and copper fouling, but it can harm your barrel if you don’t clean it off with dry patches after the manufacturer’s recommended soak time.
When in doubt, check Glock's official Caring for Your Glock resource page or visit a local dealer.
Meet the Experts

This article comes to you from Pew Pew Tactical Editor & Senior Review Analyst Scott Murdock. In addition to using Glocks from various generations in all kinds of training and work events, Scott is a Glock owner. The Glock 45 Gen5 MOS you see in these pictures is his, and this is the exact cleaning and lubricating protocol he follows after every range session (hey, old habits die hard).
Since Glocks are so popular with Pew Pew Tactical readers, Scott also uses them when he's testing red dots, lights, and holsters. Good thing they're tough!
Final Thoughts
It’s important to clean and lubricate your Glock properly and often. Now you know how!

Staying on top of routine maintenance will help you spot problems and wear items early, and your Glock will last even longer than it normally would.
Besides, cleaning your Glock is a soothing ritual that will help you understand how it works and find zen after an intense training session.
Welcome to the clean gun club!
How often do you clean and lubricate your Glock? Share your maintenance ritual in the comments. Looking for your first Glock? Check out our comprehensive guide to the Best Glocks!
Latest Updates
November 2025:Complete overhaul with new instructions, photos, and supporting content.